Friday, January 28, 2011

February's Class

Hi there!

Registration is now open for February's class.  We are doing two (yep, you read right!) 2 double page layouts and a card.  You will learn a couple of techniques to make your own embellishments, too!  How great is that, you can put these new skills to use in future layouts.  Here is a look at the card and layouts......
"I love everything about you"
A great layout to honour anyone you love using your favourite photos of them. 


"bloom where you are planted"
For those of you that do not know my youngest is adopted, I found this layout and title a good one to capture how he has grown and blossomed since we were blessed to be his forever parents.  However, it could just as nicely be used to document another milestone in your sweetie's life, such as sweet 16, communion, grade 8 grad or kindergarten grad.  It is also a great way to show how they have grown over any time period.


The class will be held on Thursday February 10th at   6.30pm.  The cost of the class is  $25.00 plus HST.   Spaces are limited so call 905-730-2673  or email us to guarantee your spot, so you won't be disappointed.

Thanks for stopping by our blog today.
Laura
xoxo


Sketch-y Friday

hello, and welcome to another Sketch-y Friday!

Here is your sketch for today, I can't wait to see what you come up with!

This evening Elaine and Anita are heading off to CHA to choose new product for the store!  Guess what?  They invited me along!  I am so excited!  I can't wait to see all the goodies, not to mention California! I'll bet there is no snow there! yayy!.  Keeping checking back, I am going with camera and laptop in hand so I can share some sneak peaks with you! And my designer reveals will be posted on the 1st of the month, as always.

In the mean time enjoy the sketch and thanks for popping in to visit us!
Laura
xoxo

Wednesday, January 26, 2011

Tips and Technique Wednesday

HI all!  Today is tips and technique day!  Today stitching is our technique of the week.  Stitching is a simple way to add a little dimension to your project.  Check it out.....

I started with this layout (based on a sketch from MME), which when I finished it, didn't really strike me as being done.
So I thought I'd add a bit of stitching, around the polka dot paper to 'frame' it.  First. gather your supplies, a piercing tools, a large eye needle, embroidery floss, and something to press into.  I use a piece of foam that came in a package of brads, another option is an old mouse pad.  If you are working on a good table make sure it is protected.
Now start by piercing holes on your layout, this paper is easy because of the grid lines, you can use a ruler to help you evenly space your holes.
 Work around the entire area you want to stitch.
Now you are ready to start stitching.  I usually secure my thread with tape as it doesn't add any bulk to the back of my layout.
 For this layout, I decided on a running stitch but you can really do any type of stitch you want to.
 Stitch around the entire area you have pierced.
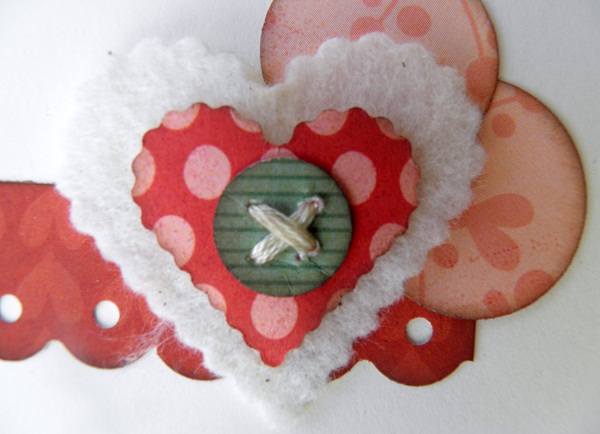
Of  course, I couldn't stop there! I decided to add a few stitches on the other side of my layout too. This time, I am doing more of a cross stitch.  As I like odd numbers, I usually cross stitch in three's.  Which means you will need 4 double sets of holes, with the top and bottom rows lined up.
Now start stitching, working on a diagonal. First, in one direction and then go back and do the opposite direction.
 Again, securing the ends on the back of the project with tape.
 And here is the finished cross stitching.
 And a look at the finished layout.
Now it feels done, a few finishing touches was all it needed!

Here is another example, it's a layout  I completed a while ago, but shows stitching as well.

For the stitching on this layout, i lightly traced around 3 different sizes of storage jars.  I then, pierced my holes approximately the same distance apart.  Then I erased the pencil lines (use a good white eraser), and stitched away!  You'll noticed there are no spaces in my stitching on  this layout.

Thanks for popping by to visit us today!
Laura
xoxo

PS  if you are looking for older techniques, they have been moved.  You can find them by going to the 'Posts by Category" section near the "Blog Archives" .  I moved them so that each technique could have it's own post instead of sharing a page, and to enable commenting.

Monday, January 24, 2011

Guess where we are going?

Give Up?  Well, let me tell you... we are going to ScrapFest!!!!!!  And we are so excited!  Look for us on April 8th and 9th this year at ScrapFest in Kitchener.  Check out the flyer for all the details you'll need.....

Tickets go on sale online February 2 at 8pm, at www.scrapfest.ca , they typically sell out early so don't wait, get a ticket and come see what we are doing!

We hope to see you there!
Laura

We have a winner!!

Well, the contest for our blog candy closed last night at midnight.  This morning I did the draw and the winner is...........

Babe O'Mara

Congratulations Babe!  Please email me here, and give me your full address so that we may send you your prize!  

Thanks to everyone for playing along!

Laura
x0x0

Sunday, January 23, 2011

A peek at our classes

Hi there!

I attended the 'Best Buddies" layout class, designed by Anita and taught by Elaine, on Saturday night, and thought that maybe those of you that haven't been to one of our classes might want to have a peek at what a class is all about.

Depending on the type of class, you will either get an all inclusive kit, or a kit plus the products needed to customize your title (etc.) with our Cricut machine.  So that you take away a completed project.

We will have a completed example on display, and we will walk you through each step, giving you cutting measurements and plenty of time to work through your layout.
 We will have some coordinating products on display, should you choose to make a purchase to add to your kit.  We will also be able to package up any other products you may want to purchase that evening.

 You will have a great time and be able to meet other scrapbookers.  They are such frienly people!
Best Buddies by Kelly

Friends Forever by Michelle

Best buddies by Victoria
And you will have a finished layout to take home!
Cooky Cousins by Cheryl

Party Monsters by Jessica

Riley's 12th birthday by Sarah
And as you see here, in these layouts, you will even have time to further customize your creations.

Now doesn't this all make you want to try a class?  Why don't you give the next one a try?  It's going to be a good one, if I do say so myself (hehehe, i designed it and i get to teach it too!)  Hope to see you soon!

Laura
xoxo

Friday, January 21, 2011

Sketch-y Friday

hello all, I'm back with today's sketch, hope you are enjoying them, and getting in some crafty time.  I thought I'd do a double page sketch this week, and one that will allow you to use a ton of photos to boot! I based it on a layout I did a couple of years ago, which i still enjoy.  Funny really because usually every couple of years my style changes and I don't really love what I have done in the past! lol

anyway, here goes....

and here is the layout i based it on....

Also, don't forget you have until Sunday the 23rd of January at midnight to get in on this blog candy draw.  If you are signing in as Anonymous please put at least your initials, so your comment will count in your favour.  (I currently have one unknown comment, if that is you please let us know!)  You know what they say, you can't win if you don't play!  good luck!

Happy Scrapping!
Laura
xoxo

Wednesday, January 19, 2011

Fan Fold Flower Tutorial

Hello everyone!

This technique is not new, but I am seeing them all over the place again right now, so I thought it might be a good share for today.

First, gather your supplies, You will need....
-a scrap of cardstock a little smaller than your desired finished flower size.
-glue dots or other really sticky adhesive
-a 12 inch strip (always) of patterned paper cut to half the width of your desired flower size (mine is about 1 1/4" after border punching the edge)
-a border punch, if desired
-some sort of scoring tool

And here goes.....
After border punching along one length of your patterned paper, trim it down to the width you have determined will best fit your project.  Always leaving the length at 12".

Score along the strip of paper, at  every 1/4" interval until the entire length has been scored.
Cover your flower's base (this doesn't have to be a circle, but hey why not) in glue dots or another tacky adhesive.
Overlapping the two ends, adhere them together with a strong adhesive.
Next, gently press down on what will be the middle of your flower, sort of arranging the folds as you go.  Sounds complicated, but it's really easy.
Adhere your base to the back of the fan-folded flower, by gently pressing it into the adhesive.
 Embellish the centre of your flower as desired, the possibilities are endless.  For this one, I opted for the simple, but you can layer punched circles with buttons, brads, bling... anything really.
And here is a quick card that I made just for my flower!

Happy crafting and please let me know if you make a fan fold flower!
Laura
xoxo

New Tutorial

*** Edited January23rd - Due to limitations in blogger, all tips and techniques are now given their own post instead of being bundled together on the 'tips and techniques' page. If you are looking for a specific technique go to the "posts by Category' section of the sidebar, below the 'blog archive'.  You can click on the "tips and Techniques" button and get a list of all the tutorials that we have posted.


Hello ladies, there is a new tutorial up for you...just click the "tips and techniques" link in the side bar!


Happy crafting!
Laura
xoxo

Tuesday, January 18, 2011

Crop for a Cure - Come out and Join Us

Hello all!

We are thrilled to announce that we will be the on-site store at a crop to raise funds and awareness for the Crohn's and Colitis foundation.    This is an annual crop that has always been a great day and we are really proud to be involved.

Those of you at our fall retreat will remember the game we played to raise funds for this foundation, we raised $300.00 and presented a cheque to our friend Laura Shaver(the organizer of this crop), during the retreat.  thank you again to our retreat participants that played along and helped raise these funds!


Here is the flyer for the crop.....

For more information you can check out their website here.

So if you are looking for a day crop for February, or you just want to help support his very worthwhile cause, give them a call and sign up.  You are in for a great day!  We hope to see you there!
Elaine and Anita

Monday, January 17, 2011

Spring Retreat

Good morning ladies!

Just a quick reminder to check out our upcoming Spring Retreat Information. 'Spring" isn't that a lovely word, ahhhh!   Click on the 'Retreat" link on our sidebar to read more.

Anyway, it is going to be a fantastic weekend, at a lovely location, why don't you join us for some girl time, get caught up on your scrapping and maybe even squeeze in a spa treatment.

Hope to see you there!

Saturday, January 15, 2011

Featured Customer - January

Hi all!  I thought we'd try out a new thing here on the blog...

Each month (possibly more often) we will feature one of our customers,with their photo, a short 'question and answer' and a couple of their favourite layouts that they have created.   Whether they are your own designs, lifts or sketch based, it is all good, every creation you make is from your heart.  They will be a great source of inspiration for all of our blog readers.

Our guinea pig, ahem, I mean our first 'Featured Customer' is also our friend Laura Shaver...

Isn't she cute?


First off, I would like to thank Laura for doing this for me, you see I asked her before I ran it by the owners, so that I could make sure someone would like to be in the spotlight, I wanted to make sure my idea would fly!.  I knew I picked right, as she readily agreed, this is one fun girl (as you can see from her photo)! 


Now, onto the questionnaire ... (we will ask each of our 'Featured  Customers' the same questions, so no surprises ladies!)


1.  {SM?} How long have you been scrapbooking?  {Laura} How long has Lee (a mutual scrappy friend) been married?! That was my first layout. Probably 11 years.
 
2.  
{SM?} Do you also create hand made cards? {Laura} Not as much as I would like but some.
 
3. 
{SM?} Who is your favourite  subject to scrapbook? {Laura} My 3 year old son.
 
4. 
{SM?} Where do you find your scrapbooking  inspiration? {Laura} From my Scrapping Ladies!
 
5. 
{SM?} Where do you scrapbook? {Laura} At home when I can but mostly at crop days and retreats.
 
6. 
{SM?} What is one of  your current favourite products?{Laura}  My favourite right now isn’t even a scrapping product officially! It is a big Stanley Fatmax rolling tool box that I use for my scrapping stuff – makes it easy as I never have to pack and I am always ready for a crop!

 And here are some of Laura's favourite creations.....

a beautiful lift
We love that this layout is fun and vibrant.

a fun original design
We love that Laura added lots of journaling.

If you would like to be a "Featured Customer' email me by clicking here and let me know that you are interested.  By agreeing to be a "Featured Customer' you agree to the following....

1.  Your name and photo are posted on the blog.
2.  You layouts and whether or not they are lifts, originals or sketched based (no need to remember where you lifted them from) as well as the photos of these layouts will be posted on the blog.
3.  You have permission to post the photos of the people in the layouts on the blog.
4.  You give us consent to add your layouts to our 'Layout Inspiration' slide show, on the side bar of our blog..

Do you want to play along with us, send me an email, via the link above.  Go for it, we'd love to hear from you!
Laura